
|
Washington Articles of Incorporation Nonprofit Corporation |
The Washington Articles of Incorporation Nonprofit Corporation must be submitted to the Washington Secretary of State Corporation Division by entities wishing to incorporate, in the State of Washington, as a nonprofit corporation. It is fair to mention, some entities may need to submit additional provisions and/or paperwork as the information requested on this template form will only represent the bare minimum that must be reported. For instance, those seeking Tax-Exempt Status will have to include specific language or corporations with a specific plan when dissolving will need to include more information. If there is not enough room, you may continue reporting the necessary information on an attachment that is clearly labeled and neatly presented. On the whole, the process of incorporating an entity may differ significantly depending on such factors as the type of entity being formed. Incorporators are, thus, encouraged to take the initiative in their research of this process and should consult a Washington attorney to make sure the incorporation process is clear and all requirements are fulfilled.
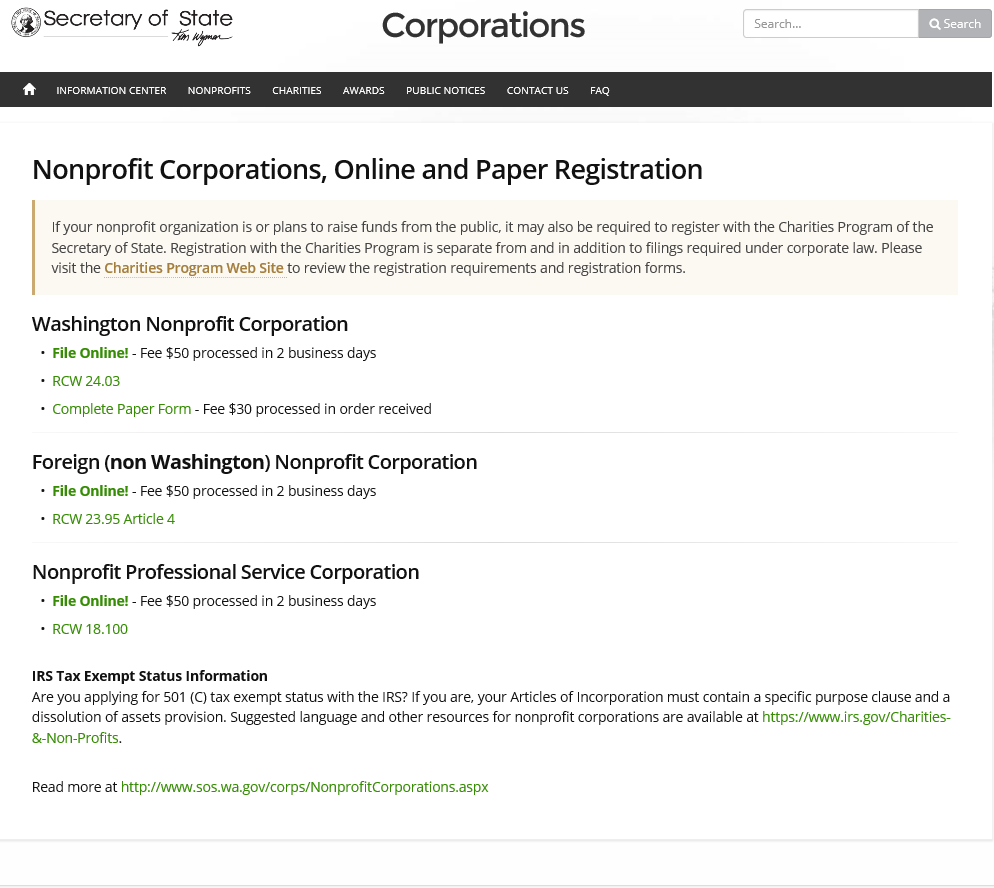
The Washington Articles of Incorporation Nonprofit Corporation along with all required documents may be submitted by mail to the Washington Secretary of State Corporation Division. This must be accompanied with a Full Payment of the $30.00 Filing Fee in the form of a check made out to Secretary of State. If you wish the submission to be expedited this will shorten the average two to three week processing time to two to three days. You may do this by paying an extra $50.00 and writing the word “Expedite” on the envelope. You may mail the articles to Secretary of State, Corporations Division, 801 Capitol Way S, PO Box 40234, Olympia WA 98504-0234.
How To File
Step 1 – Download the Washington Articles of Incorporation Nonprofit Corporation by selecting the “Download Form” link then saving it to your computer. This form may be filled in with an appropriate program such as a PDF editor or it may be printed then filled out. Note: If you do not have enough room in the sections for the information that needs to be presented or need to add additional provisions, the Washington Corporation Division of the Washington Secretary of State will accept attachments so long as they are clearly labeled.
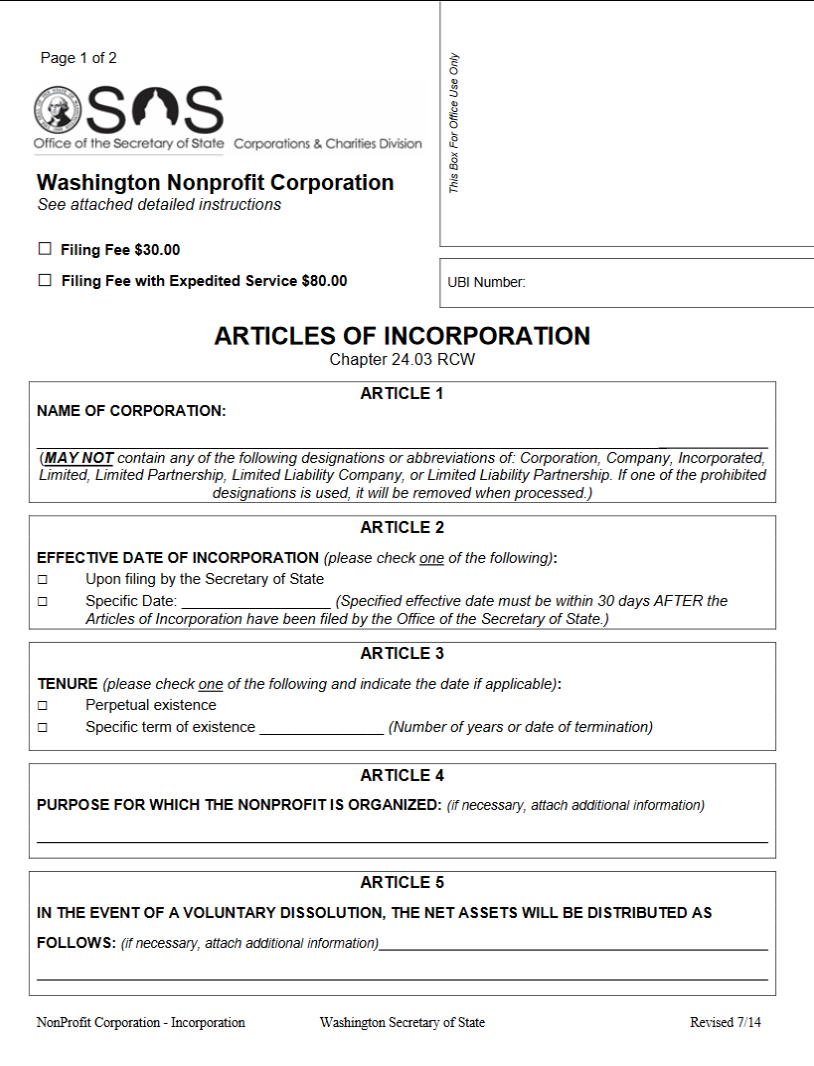
Step 2 – In the upper left hand corner you must indicate if you would like these articles expedited. If not, then place a check mark in the box labeled “Filing Fee 30.00.” If you would like these articles to be expedited then mark the second box, labeled “Filing Fee with Expedited Service $80.00.”
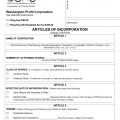
Step 3 – Next, in Article 1, enter the Full Name of the forming nonprofit corporation on the blank line provided.
Step 4 – In the next section, “Effective Date of Incorporation” (Article 2), check the first box if you would like this entity to gain its corporate status immediately upon a successful filing of the Washington Articles of Incorporation Nonprofit Corporation being submitted. If not, mark the second box then, on the blank line provided, enter the Specific Date after the Filing Date when you would like the corporate status take effect.
Step 5 – Make a mark in the first box, in Article 3, if the forming Washington nonprofit corporation shall operate without any intended Date of Dissolution. If this nonprofit corporation intends to dissolve on a specific day then mark the second box and enter either the number of years until Dissolution or the Date of Dissolution on the blank line following the words “Specific Term of Existence.”
Step 6 – In Article 4, document the specific purpose of the forming Washington Nonprofit Corporation. Some entities may require specific language to be used, if there is not enough room you may continue this section on another sheet of paper and attach it to the articles.
Step 7 – Report the intended plan of how Net Assets will be distributed in the event of a Voluntary Dissolution on the blank line in Article 5. If there is not enough room, you may continue this section on another sheet of paper then attach it to the articles.
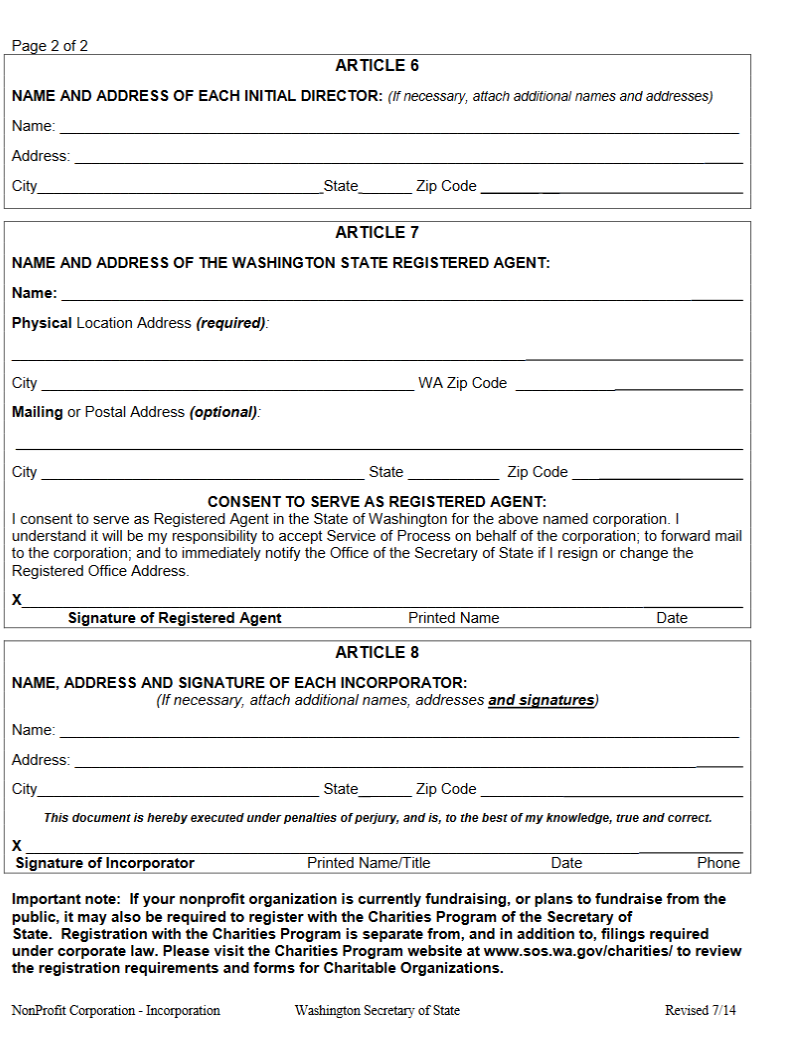
Step 8 – Next, in Article 7, you will need to give a report on the Washington Registered Agent who has consented to receive service of process and/or other court generated document on behalf of the forming Washington nonprofit corporation. There will be three areas. In the first area, enter the Full Name of the Washington Registered Agent on the first blank line. Then, below the line “Physical Address Location (required),” enter the Building Number, Street, and Unit Number of the Registered Office. Report the City and Zip Code on the next line in the spaces provided. If the Registered Agent’s Mailing Address differs from his/her/its Physical Address then report the Mailing Address utilizing the two lines below the words “Mailing or Postal Address (optional).”
Step 9 – On the blank line below the paragraph labeled “Consent to Serve as Registered Agent,” the Washington Registered Agent must Sign his or her Name. The Registered Agent must also provide a Printed Name next to his/her Signature then enter the Date of Signature. Finally, on the same line, the Registered Agent must provide his or her Telephone Number.
Step 10 – Article 8 will require that each Incorporator must provide his or her Name, Street Address, Signature, Printed Name, Title, Date of Signature and Phone Number. If necessary you may continue this on a separate sheet of clearly labeled paper.
Step 11 – Organize all the documents accompanying the Washington Articles of Incorporation Nonprofit Corporation and include a check for the proper Fee. If filing without expediting, the Total Fee will be $30.00. If you are expediting the Total Fee will be $80.00 (write the word “Expedite” on the envelope, if you are expediting). All payments should be made with a check or money order payable to Secretary of State.
Mail To:
Secretary of State
Corporations Division
801 Capitol Way S
PO Box 40234
Olympia WA 98504-0234
How To File Online
Step 1 – Go to https://www.sos.wa.gov/corps/NonprofitCorporationsONLINEandpaperregistration.aspx then under “Washington NonProfit Corporation,” select the link labeled “File Online.”
 Step 2 – Select the button labeled “Start New.”

Step 3 – This next page will give you the option of either filing a new document or returning to one that you need to continue. Select the button labeled “Start New.”
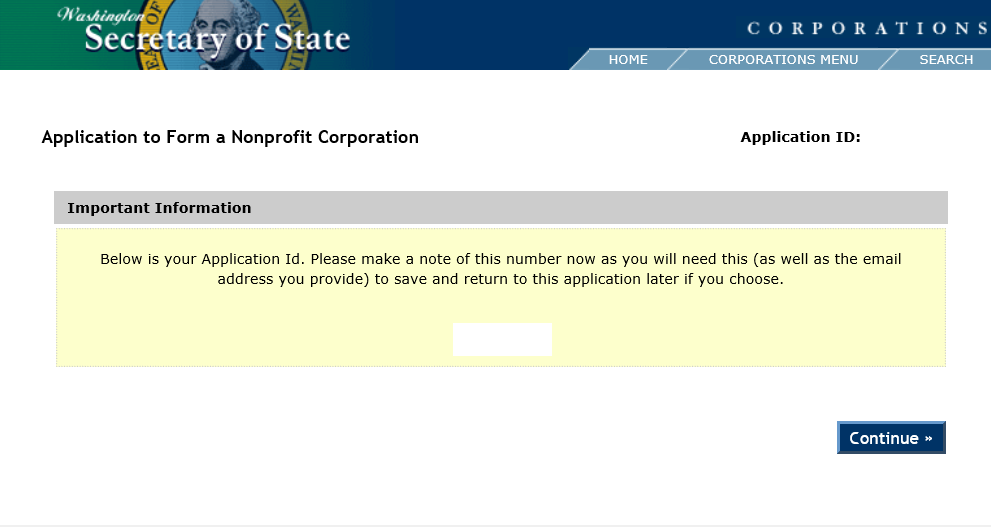
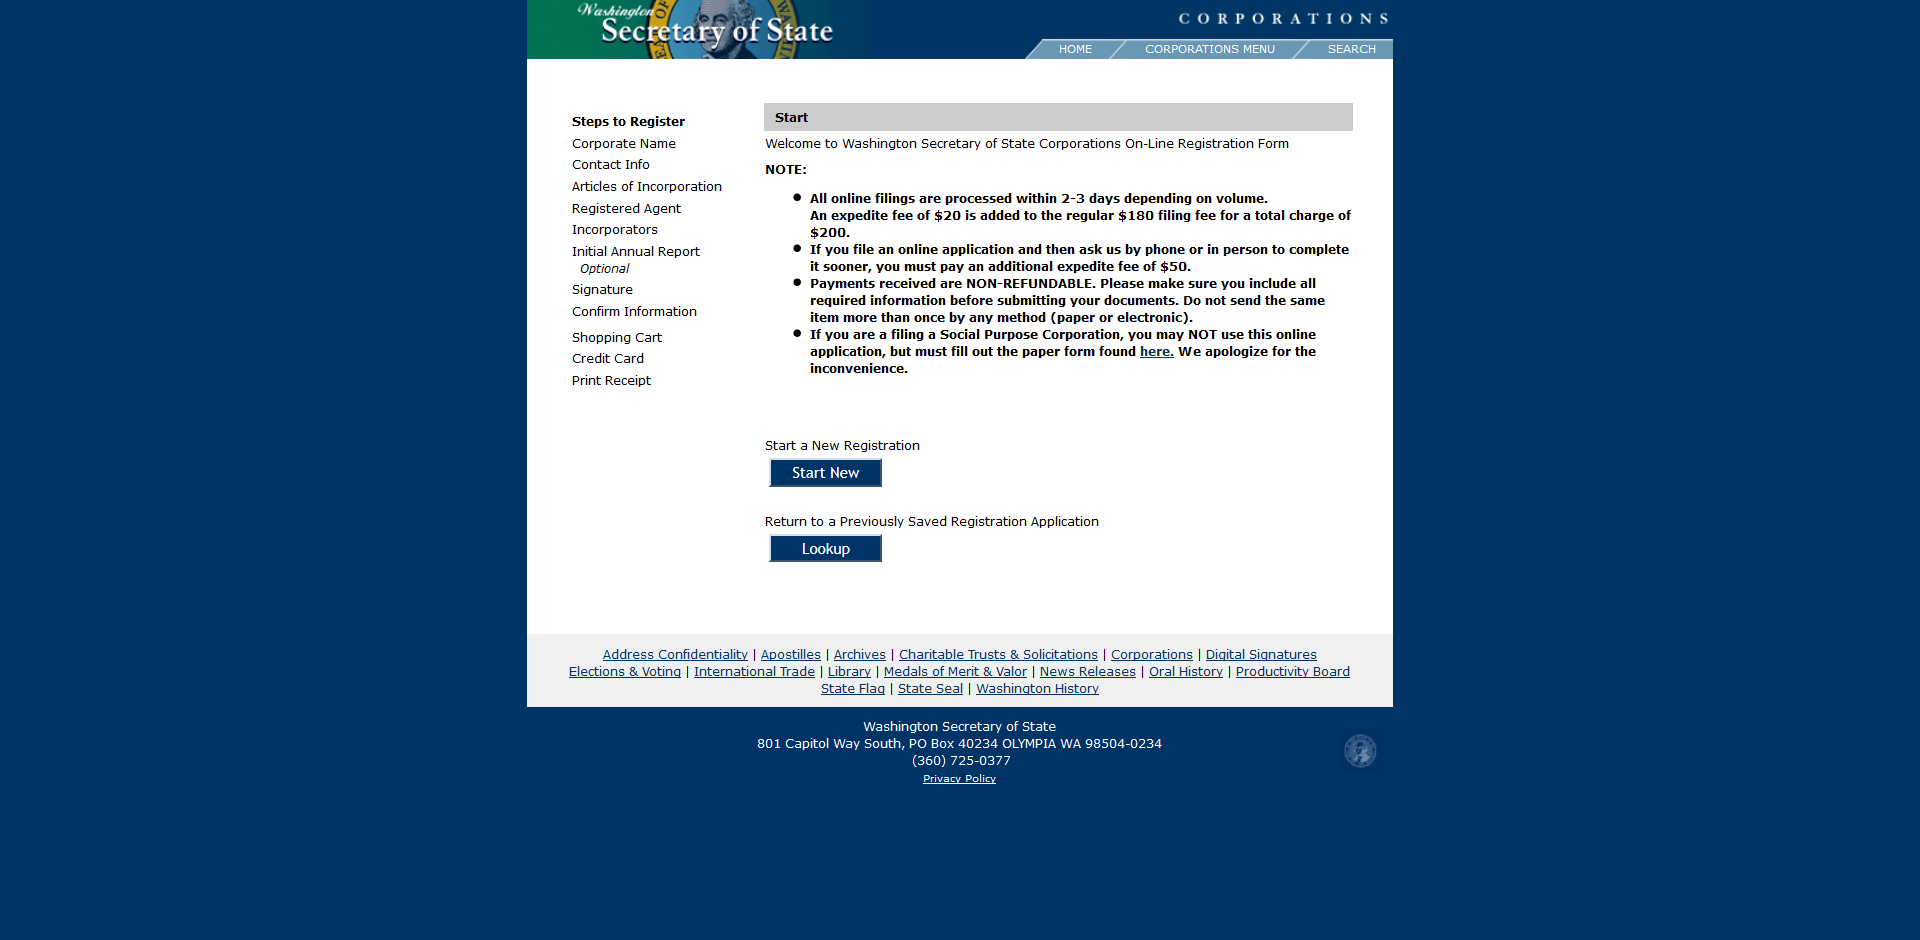 Step 4 – The number displayed in the center of the page is your Application ID Number. Keep this in your records as this may be useful in the future.
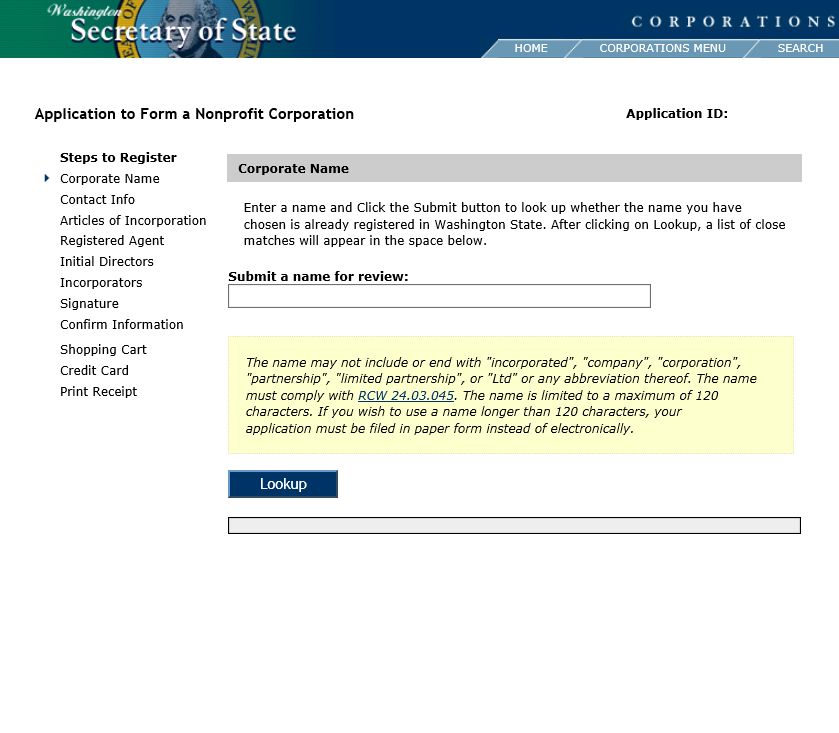
 Step 5 – Next enter the Full Name of the corporation you are forming in the text field labeled “Submit a name for review.” When you are ready select the button labeled “Lookup.”
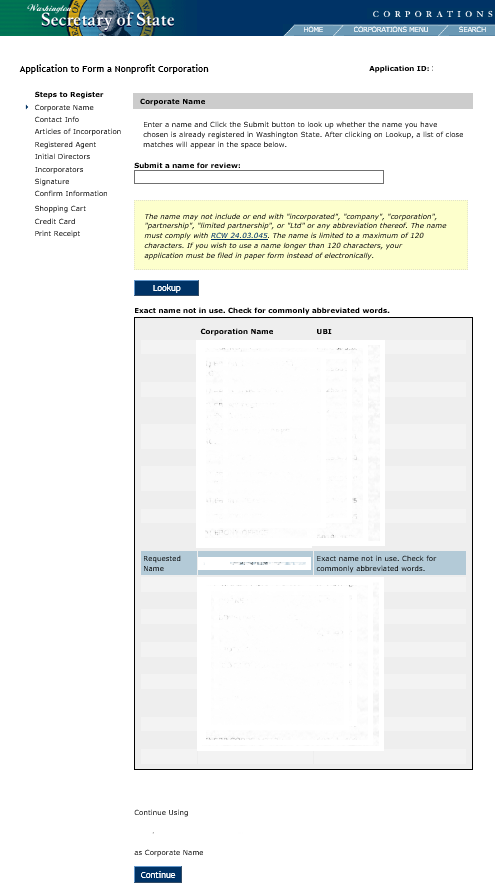
 Step 6 – The Name you entered will appear in a table with entities bearing a similar Name. Locate the row highlighted in blue. If the Name is available you may proceed to the next screen. If not, use the text field above the table to search for other Names until you have found one that is available. Once this is done select the link labeled “Continue” at the bottom of the page.
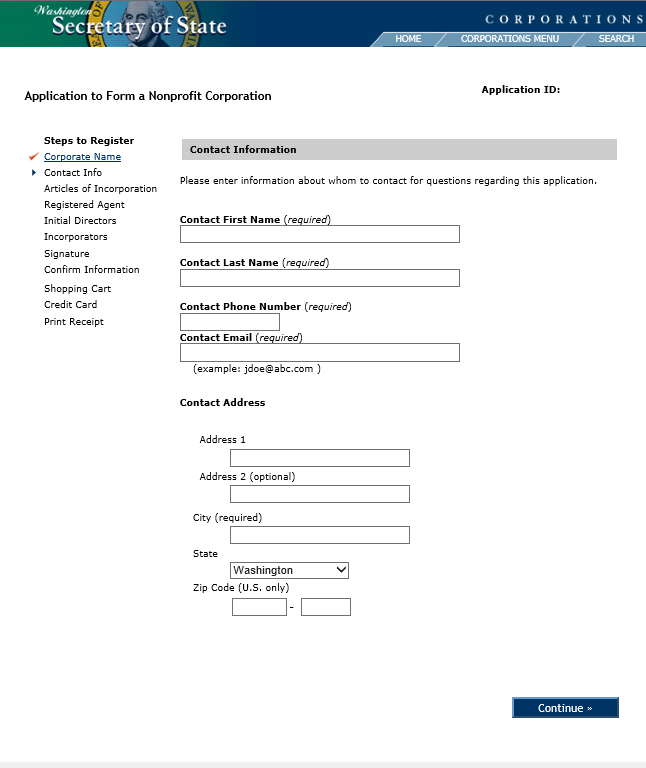
 Step 7 – Next, you will need to provide some Contact information for the Washington Secretary of State. Use the first two fields to enter the Full Name of the individual who will act as a Contact. Then enter the Phone Number and Email where the Contact person may be reliably reached. Once you have done this select the button labeled “Continue.”
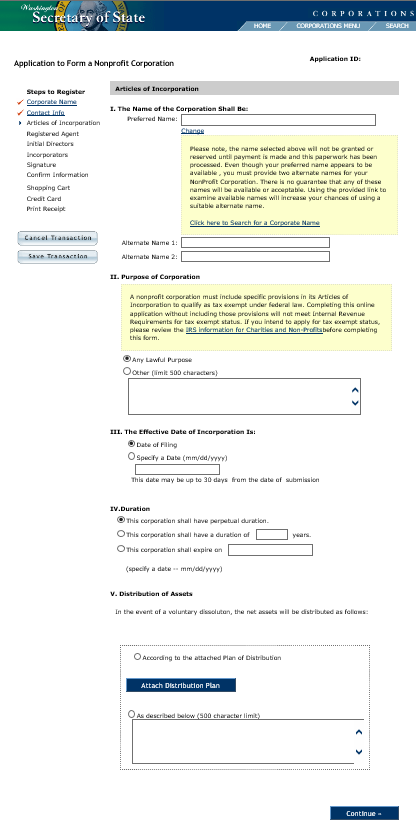
 Step 8 – Report the Full Name of the forming nonprofit corporation in the text box in Article I. You may pick an additional two Names in case the one you have selected is unavailable. The first available Name will be used. Enter you second choice in the field labeled “Alternate Name 1” and your third choice in “Alternate Name 2.”
Step 9 – In Article II, you may choose to select the first radio button to use as the Purpose of this corporation however this would not satisfy IRS requirements should this corporation wish to apply for Tax Exempt Status. If you wish to enter a specific purpose or to use language that is 501 (c)(3) compliant, then select the second bubble and use the text box to report the Purpose of the corporation.
Step 11 – In Article III, you may select and Effective Date for the articles being submitted. If you wish the Effective Date to be upon a successful filing, then mark the first bubble. If you wish to select a specific Date of Effect, between the Filing Date and 90 Days after the Filing Date, then mark the second bubble and enter the Specific Date you desire for the Date of Effect.
Step 12 – In Article IV, you need to define the period of Duration.
Step 13 – If there is a specific plan that is greater then 500 words for the Distribution of Assets upon Dissolution then check the first button. You will need to use the “Attach Distribution Plan” button to upload the Distribution of Assets upon Dissolution plan that needs to be attached to the articles. If the Distribution Plan is less than 500 words then you may check the second bubble and document this plan in the text box provided. Once you are done, select “Continue.”
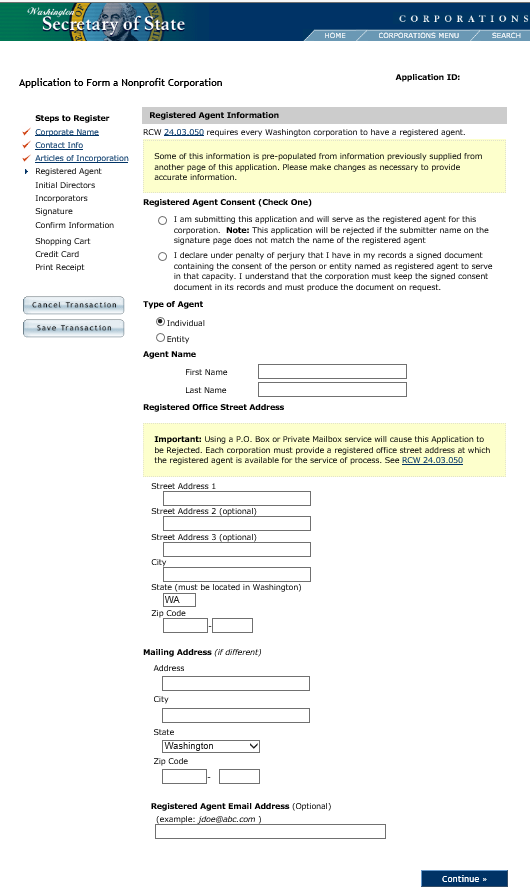
 Step 14 – Next you will need to report some information regarding the Washington Registered Agent you have obtained. First, you must establish whether you are the Washington Registered Agent or verify that you have obtained the consent paperwork from the Registered Agent. If you are the Registered Agent, mark the first bubble. If you are not, mark the second bubble.
Step 15 – Locate the heading “Type of Agent.” If the Washington Registered Agent is an Individual, then mark the first bubble. If the Washington Registered Agent is a business then mark the second bubble. (For our purposes, select Individual)
Step 16 – Enter the First Name of the Registered Agent in the field labeled “First Name.” Then enter the Last Name of the Registered Agent in the field labeled “Last Name.”
Step 17 – In the Registered Office Street Address, you will need to report at least one Address. The first few fields (Street Address 1, Street Address 2, Street Address 3, City, State, and Zip Code) will require the Address where the Registered Office is geographically located and may be physically found. If the Registered Office receives its mail at a different address, then enter this Mailing Address in the section labeled “Mailing Address.” If the Registered Office does not have a separate Mailing Address, you may leave this section blank. Finally, you have the option of entering an Email Address where the Registered Agent may be reached. Once you are done entering the information on this page, you may select “Continue.”
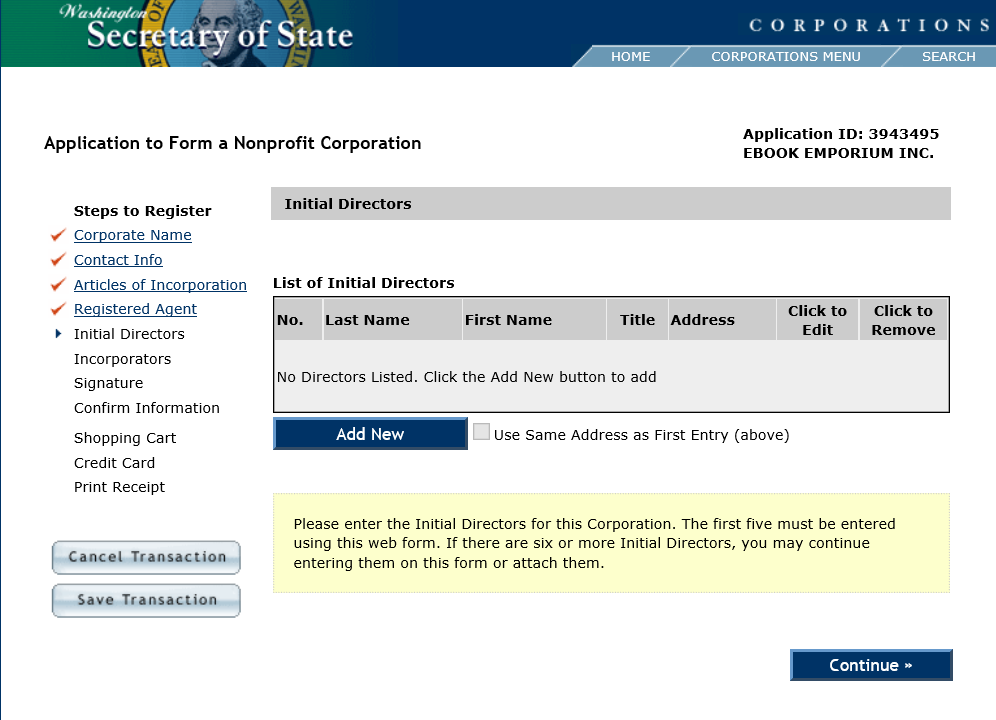
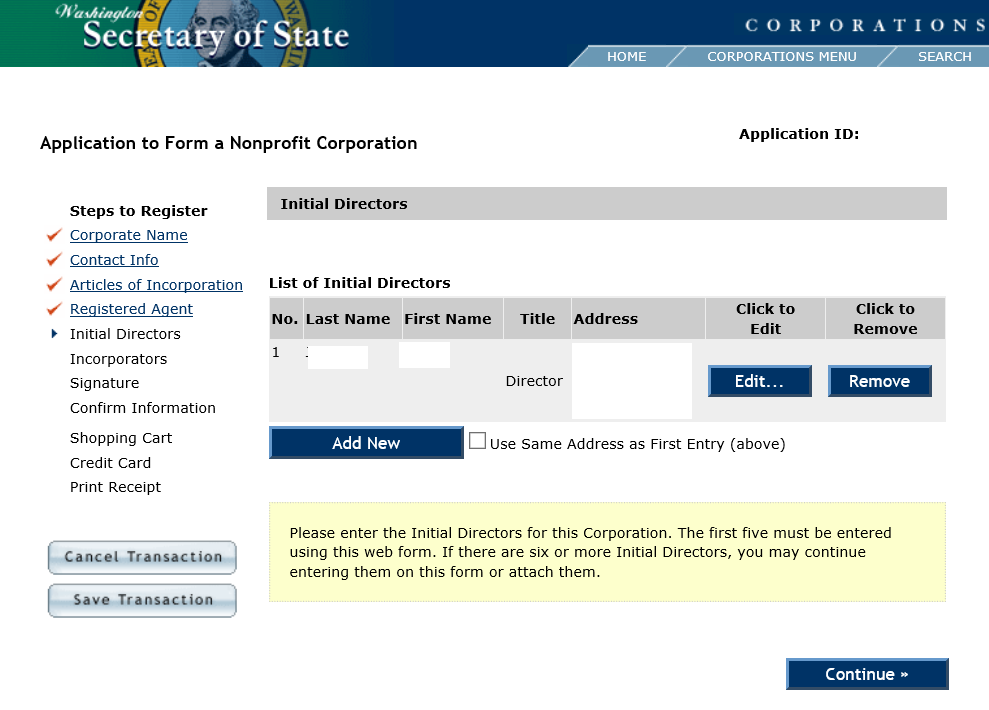
 Step 18 – Here, you will need to enter information for the Initial Directors of this nonprofit corporation. To begin, select the button labeled “Add New.”
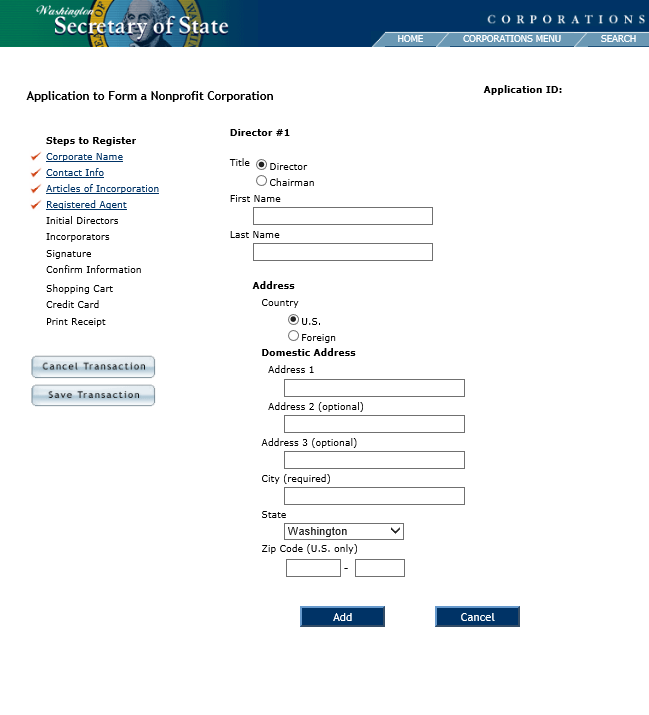
 Step 19 – Here you may enter information regarding the initial Directors. If you are reporting a Director then select the first radio button. If you are reporting a Chairman, then select the second radio button.
Step 20 – Enter the Full Name of the Director (or Chairman) using the fields “First Name” and “Last Name.”
Step 21 – In the Address section, locate the heading labeled “Country.” If the individual being reported is in the U.S. then select the first radio button. If the individual being reported is in a foreign country then mark the second radio button. Below this you will be provided with three text fields (Address 1, Address 2, and Address 3) to enter the complete Street Address (Building Number/Street/Unit Number) of the Individual being reported. Then report the City, State, and Zip Code for this Incorporator’s Address. Once you are done, select the “Add” button.
 Step 22 – The table will display the information you have just entered (you may edit or delete this information at any time). You may either use the “Add” button to enter information for another Initial Director or, if done, select the “Continue” button.
 Step 23 – Next, you will need to enter information regarding the Incorporators of this nonprofit corporation. Select the button labeled “Add New” to begin.
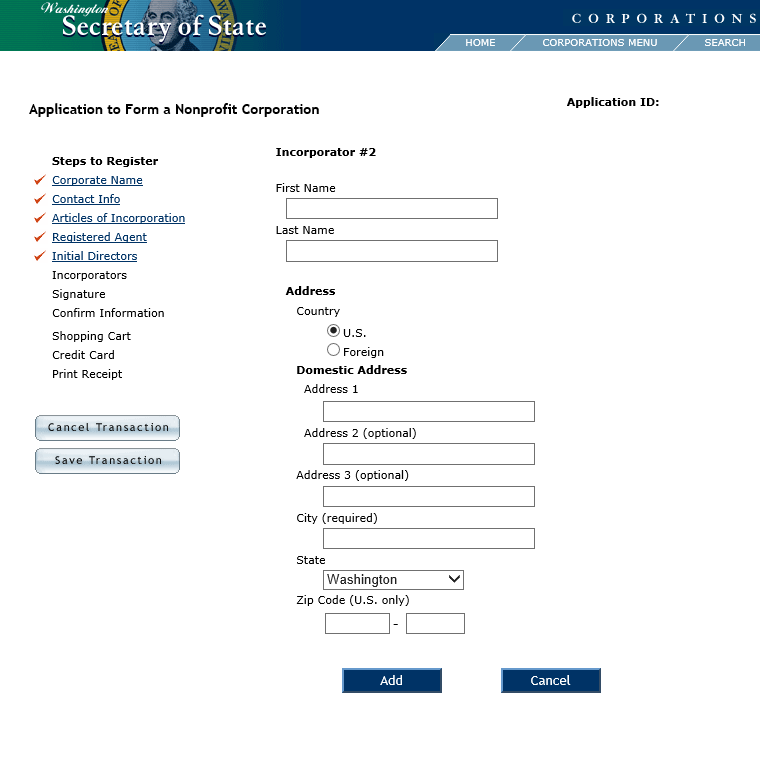
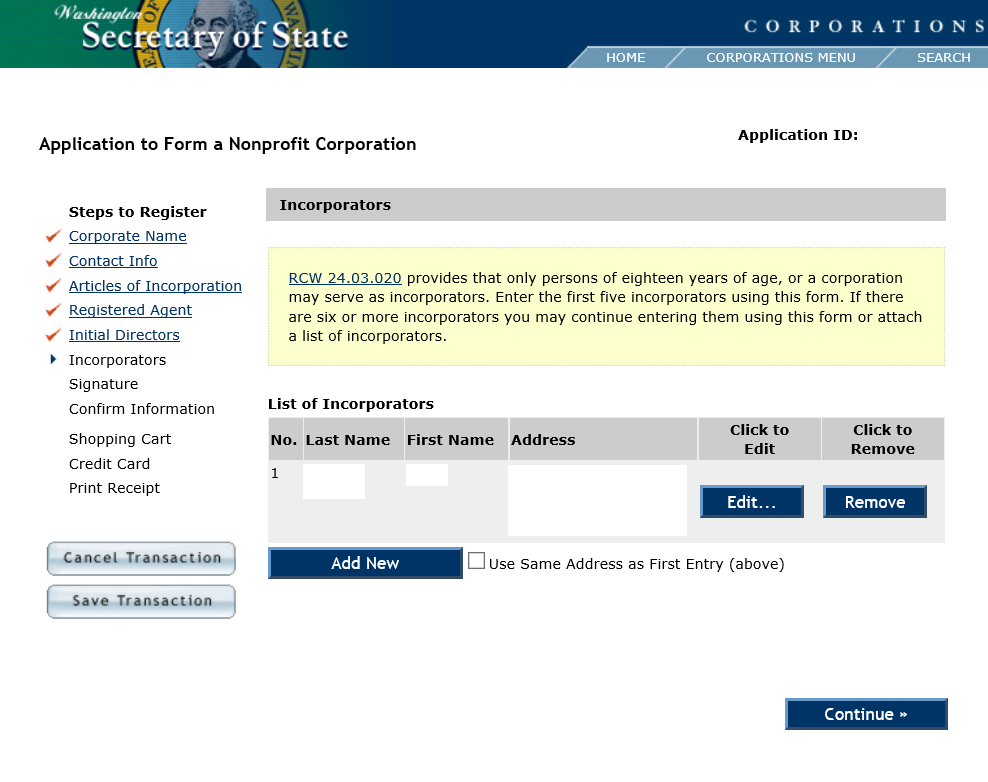 Step 24 – You must enter the First Name and Last Name of an Incorporator using the first two fields on this page.
Step 25 – Under the “Address” heading, select the first radio button if the Incorporator has a U.S. Address or select the second radio button if the Incorporator has a Foreign Address.
Step 26 – Enter the Building Number, Street, and Unit Number in the field labeled “Address 1.” If there is not enough room, you may continue this in the fields labeled “Address 2” and “Address 3.” Then enter the City/State/Zip Code in the field labeled “City,” the field labeled “State, and the field labeled “Zip Code” respectively. When you are done, select the button labeled “Add.”
Step 27 – If you need to enter more Incorporators, select the button labeled “Add New.” Once you have entered the Incorporators, select the “Continue” button.
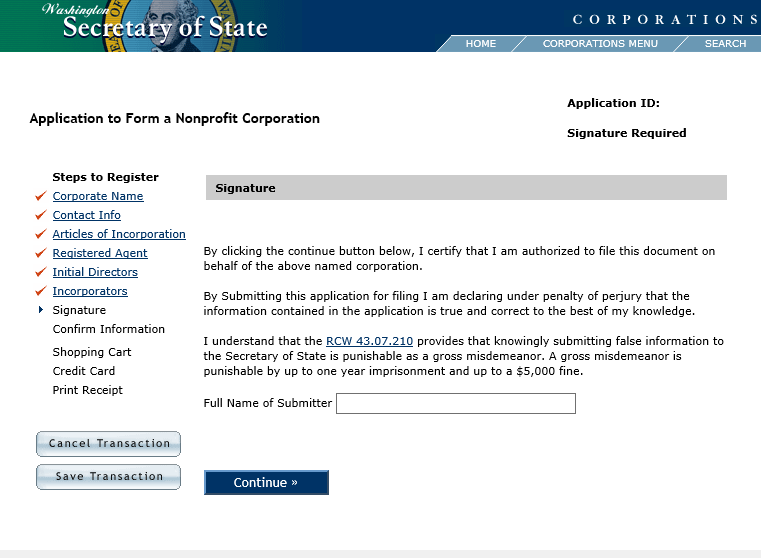
Step 28 – The Submitter of these articles must enter his or her Name in the field labeled “Full Name of Submitter.” Once this is done, select “Continue.”
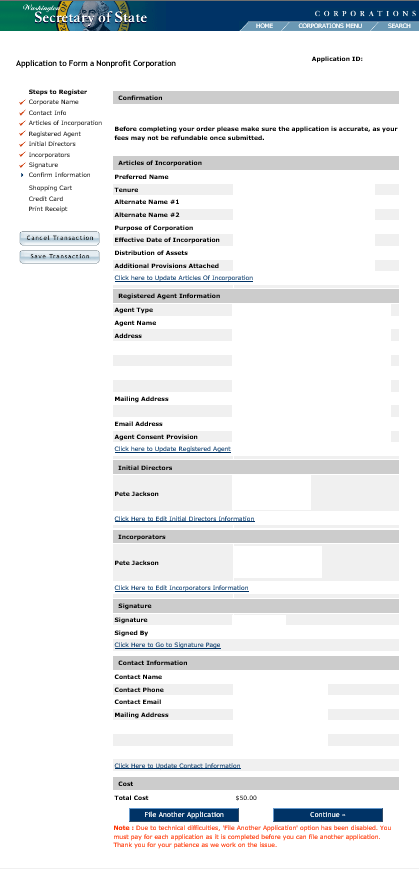
 Step 29 – Next, review all the information you are about to submit. This must be done carefully. If any sections need to be edited, you may use the menu items on the left to navigate easily or select the link at the bottom of each section. Once you are ready, select “Continue.” This will direct you to an area where you may verify the Filing Fee of $50.00. After this you will be able to pay using a credit card.
Related Forms
 Washington Articles of Incorporation Profit Corporation
 Washington Application for a Certificate of Authority Foreign Profit Corporation
 Ohio Nonprofit Articles of Incorporation Nonprofit Domestic Corporation | Form 532B
 District of Columbia Articles of Incorporation Nonprofit Corporation | Form DNP-1
